The Impact of Clipping Masks on Procreate
Introduction
Procreate has transformed digital art creation, offering a wide range of tools and features to unleash the creativity of artists. One of the powerful tools within Procreate is the clipping mask. In this article, we will explore the impact of clipping masks in Procreate and how they can enhance your artwork. Whether you’re a freshman or an educated artist, understanding and exercising trimming masks can elevate your digital art to new heights.
Table of Contents
- Understanding Clipping Masks in Procreate
- Benefits of Using Clipping Masks
- Creating Clipping Masks in Procreate
- turn the layer into a clipping mask
- swipe right with two fingers,
- separate layer, select clipping mask from the layer options menu
- select alpha lock, create a new layer
- white reveals layers panel
- masks and alpha lock
- area that already has paint
- tap alpha lock
- checkered background
- layer mask in Procreate
- clipping mask option
- alpha lock in procreate
- image masking service
Understanding Clipping Masks in Procreate
Clipping masks allow you to apply an image or shape as a mask to limit the visibility of other layers underneath. Essentially, it enables you to create artwork within a specific shape or boundary, providing precision and control over your compositions. By using clipping masks, you can effortlessly achieve complex effects and transformations without affecting the underlying layers.

Benefits of Using Clipping Masks
- Organized Workflow: Clipping masks help maintain a neat and organized layer structure, making it easier to manage and edit your artwork.
- Non-Destructive Editing: With clipping masks, you can experiment with different effects and styles while preserving the original layers intact.
- Selective application: Clipping masks provide you with fine control over the final product. By allowing you to only apply effects or edits to certain parts of your artwork.
- Efficient Texturing: You can easily add texture, patterns, or gradients within specific shapes to enhance the visual appeal of your artwork.
- Dynamic Artistic Effects: By combining different layers and masking techniques, clipping masks enable you to create unique and dynamic artistic effects.
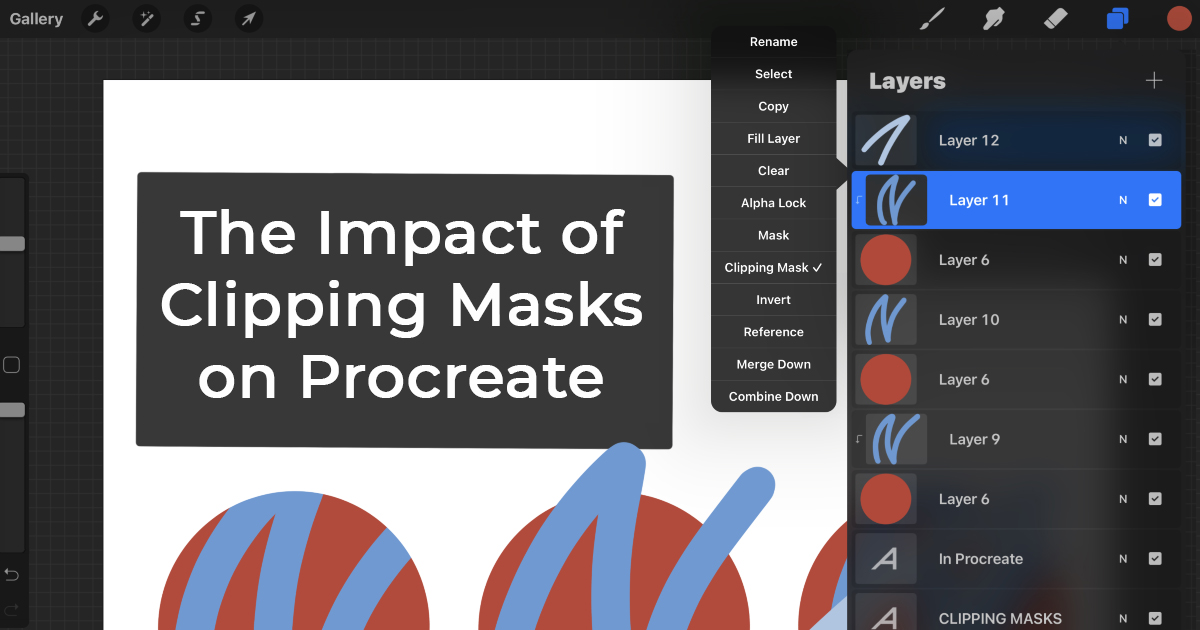
Creating Clipping Masks in Procreate
To create a clipping mask in Procreate, follow these steps:
- Select the layer you want to mask.
- Swipe right on the layer to access the Actions menu.
- Tap on “Clipping Mask” to create a mask layer.
- Position the mask layer above the layer you want to mask.
- Start drawing or painting on the mask layer to reveal the underlying artwork.
Advanced Techniques with Clipping Masks
The basic use of clipping masks is to hide individual layers, you can use more advanced techniques to get the most out of clipping masks in Procreate. Here are a few ideas to explore:
- Multiple Layers: Apply clipping masks to multiple layers simultaneously, creating intricate compositions and layering effects.
- Blending Modes: Experiment with different blending modes on the mask layer to achieve unique blending and interaction between layers.
- Alpha Locking: Use alpha locking in conjunction with clipping masks to restrict your brushstrokes or adjustments to the masked area only.
- Gradient Masks: Apply gradients as masks to create smooth transitions or subtle fades in your artwork.
- Nested Clipping Masks: Nest one clipping mask within another to achieve complex masking effects and layered compositions.
Tips for Using Clipping Masks Effectively
- Experiment and Explore: Don’t be afraid to try different combinations of layers, masks, and brushes to discover new creative possibilities.
- Layer Order: Pay attention to the layer order when using clipping masks. The mask layer should be positioned above the layer you want to mask.
- Refining Masks: Use erasers, selection tools, or layer adjustments to refine and tweak your masks for precise control.
- Masking with Selections: Combine selections with clipping masks to create more intricate and accurate masks.
- Opacity Adjustments: Adjust the opacity of the mask layer to control the visibility and intensity of the masked effect.
Exploring Creative Possibilities with Clipping Masks
Clipping masks open up a world of creative possibilities. Here are a few examples to inspire your artistic endeavors:
- Illustrations with Textures: Create illustrations with intricate textures by applying various textures as clipping masks to add depth and character.
- Collage Art: Combine different images and elements using clipping masks to create captivating and visually dynamic collage art.
- Abstract Art: Experiment with shapes, gradients, and layering effects to produce stunning abstract artwork using clipping masks.
- Digital Scrapbooking: Use clipping masks to seamlessly integrate photos, papers, and embellishments in your digital scrapbook layouts.
- Character Design: Apply clipping masks to shape and mold different elements of character designs, allowing for quick iterations and experimentation.
Clipping Masks vs. Layer Masks: What’s the Difference?
While both clipping masks and layer masks serve similar purposes, they differ in their application and functionality. Here’s a brief comparison:
- Clipping Masks: Restrict the visibility of one layer based on the content of another layer or shape, creating a “clipped” effect.
- Layer Masks: Control the visibility of specific areas within a layer, allowing you to hide or reveal parts of the layer using brushes or selections.
Understanding the distinction between the two will enable you to choose the appropriate masking technique for your specific needs.
Troubleshooting Clipping Mask Issues
Sometimes, issues may arise while working with clipping masks. Here are some common problems and their solutions:
- Layer Order: Ensure that the mask layer is positioned above the layer you want to mask.
- Opacity: Check the opacity settings of the mask layer to ensure the desired visibility of the masked effect.
- Brush Opacity: Adjust the opacity of your brushes when painting on a mask to control the intensity of the masked effect.
- Masking Outside the Boundaries: If you accidentally paint outside the mask boundaries. Use the eraser tool or layer adjustments to correct the issue.
- Layer Modes: Experiment with different layer blending modes to resolve any unexpected interactions between layers.
Clipping Masks in Procreate: A Time-Saving Tool
One of the significant advantages of using clipping masks in Procreate is their ability to save time and streamline your workflow. By allowing you to work on specific areas while maintaining integrity. Of underlying layers, clipping masks enable faster iterations and targeted adjustments.
Integrating Clipping Masks in Your Artistic Process
To fully utilize the power of clipping masks, consider incorporating them into your artistic process. Here are a few ways to do so:
- Planning and Sketching: Use clipping masks to experiment with different compositions and visual elements before committing to a final design.
- Layer Management: Organize your layers with clipping masks to maintain a structured and editable artwork file.
- Experimentation: Allocate dedicated time to explore new techniques and effects with clipping masks, pushing the boundaries of your creativity.
- Collaboration: Share your knowledge of clipping masks with fellow artists and explore collaborative projects to expand your artistic horizons.
Using Clipping Masks for Textures and Patterns
Clipping masks provide an excellent tool for incorporating textures and patterns into your artwork. By applying them selectively, you can achieve cohesive and visually appealing results. Experiment with various textures and patterns to find the perfect match for your artistic vision.
Clipping Masks and Color Adjustments
Color adjustments play a crucial role in digital art. Clipping masks allow you to apply color adjustments selectively, altering specific areas while keeping the rest of your artwork untouched. This level of control enables you to fine-tune the color palette, enhance contrast, or create unique color grading effects.